How to Implement Page Level Cache Control in Umbraco 8
There may be a time where you or your client requires the ability to change the caching level on an individual page basis without making changes to IIS or web.config. Perhaps you have a page which is constantly updated, and you also have another page which never changes. In such cases the ability to control the Cache-Control header on an individual page basis directly from the CMS can be very helpful.
This blog post will show you how you to do this in Umbraco, giving you the code to do it and explaining what we are doing along the way. There are lots of different settings you might want to use in terms of cacheability, expiration, revalidation and reloading. We are just going to focus on giving you the ability to set:
- public
- private
- no-cache
- no-store
- max-age={number of seconds}
You can learn more about the different settings in this article on MDN
PublishedRequest Pipeline
A good starting point would be to understand how we are able to change the response headers on an individual page bases. This is by hooking into the PublishedRequest_Prepared event, just before the page is rendered. This is our opportunity to add headers to the response.
We will start off by adding a value to this header now. We need to create a composer and component to be able hook into the PublishedRequest_Prepared event.
using System; using Umbraco.Core; using Umbraco.Core.Composing; using Umbraco.Web.Routing;
namespace MyProject.Core.Composing
{
    [RuntimeLevel(MinLevel = RuntimeLevel.Run)]
    public class PublishedRequestComposer : IUserComposer
    {
        public void Compose(Composition composition)
        {
            composition.Components().Append<PublishedRequestComponent>();
        }
    }

    public class PublishedRequestComponent : IComponent
    {
        public void Initialize()
        {
            PublishedRequest.Prepared += PublishedRequest_Prepared;
        }

        private void PublishedRequest_Prepared(object sender, EventArgs e)
        {
            var request = sender as PublishedRequest;

            request.Headers.Add("Cache-Control", "no-cache");
        }

        public void Terminate()
        {
            //unsubscribe during shutdown
            PublishedRequest.Prepared -= PublishedRequest_Prepared;
        }
    }
}
The main part here is where we take the request and add the header:
private void PublishedRequest_Prepared(object sender, EventArgs e)
{
    var request = sender as PublishedRequest;

    request.Headers.Add("Cache-Control", "no-cache");
}
Let’s load a page, open dev tools, open the network tab, find the request for the page load and then see the Cache-Control header value.

Now that we know how to change the header value, we can start working in Umbraco to make it editable per page.
Giving the Umbraco user the control
When working on document types in Umbraco it is important to focus on user experience. We could just add a cachability dropdown with the options in it for no-cache, no-store and public. Then we could have a Max Age property. But the max age is not always relevant and it's hard to work out the number of seconds, so we are going to use a Nested Content property and add the relevant setting to the page that way. We will create 3 document types to hold these settings; Do Not Cache, Do Not Store, and Enable Caching.
Before we create the nested content data type let's create an element type. We will start with the simplest option, no-cache.
Do Not Cache, Element Type
For the no-cache setting
- 1 label property to give information about this setting
Create a new document type as an Element Type

Name the document type Do Not Cache and give it a description of If you choose this setting, it will add a Cache-Control header to the page to say this page should not be cached.
This document type doesn't really need any properties because they fact that it has been added to the nested content property will mean you don't want caching so there is nothing to set. However, it would be a better user experience to add a note or label to give some information about the setting you have chosen.
With that in mind, add a group called 'Caching' to this document type.
Label Property
In this group, add a property called No Cache Information and a description of If you choose this setting, it will add a Cache-Control header to the page to say this page should not be cached.
Click on Select Editor search for label and select the existing label (string) one

Click on Submit on the Label data type and before you submit on the property editor screen, make sure you set the Label above (full width) to true

When you have done this, hit submit and you should be back to the document type screen which should look like this:

Do Not Store Element Type
For the no-store setting
- 1 label property to give information about this setting
Follow the same process as above to create this new Element Type. Call it Do Not Store and give it a description of Choosing this setting will add a Cache-Control header to say the response may not be stored in any cache
Label Property
Then add a Caching group with a label called Do Not Store Information and a description for this label of The response may not be stored in any cache. Note that this will not prevent a valid pre-existing cached response being returned.
Your Do Not Store Element Type should look like this:

Public Cache Element Type
For the public max-age=x setting
- 1 label property
- 1 text property to hold the duration amount
- 1 radio button list property to hold the duration unit
Now lets create another Document Type as an Element Type and call it Enable Caching with a description of Choosing this setting will add a Cache-Control header to the page to say how long this page should be cached for.
Label Property
Again, the same as above, we will create a Group called Caching and add a Label, this time call it Enable Caching Information with a description of When you choose this setting, you will need to choose how many minutes, hours or days you would like it to be cached for. It will then add a Cache-Control header to the page to say how long this page should be cached for.

Numeric Property
We want to allow the user to decide how long they want to cache the page for so we will give them a text box for the duration.
Add a property to the document type, call it Cache Duration and give it a description of Enter the duration you would like to cache for. Be sure to make this value relative to the cache duration unit.
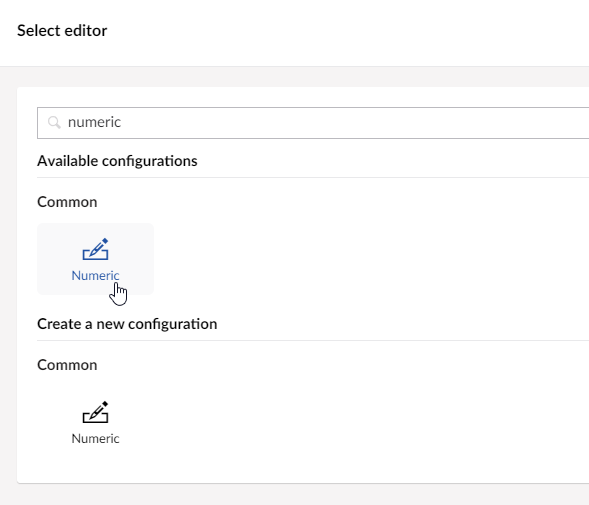
Click on Select Editor and search for Numeric, choose the one in the Common group and press submit
Make sure you set the property to be mandatory and set the label to appear above

Radio Button List
The last property we need to create is a radio button list to enable the user to state the cache duration unit. When this is combined with the cache duration property it creates a better user experience for the editor, rather than leaving them to work out how many seconds to cache for, they can simply enter 30 in the duration and choose days in the cache duration unit property. We will work out the number of seconds for them.
Create a new property called Cache Duration Unit and give it a description of Enter the unit you would like to use for your cache duration setting
Click on Select Editor and search for radio and choose Radio button list.

Enter a name of [RadioButtonList] Cache Duration Unit and add these options:
- days
- hours
- minutes
- seconds

Click on submit and then set the property to be mandatory and the label to appear above the property

When you click submit you should have a document type which looks like this:

Nested Content Data Type
Now we have our settings document types we need to create a nested content data type to allow us to pick these settings.
Create a new data type called [Nested] Cache Control Add the element types we created; Do Not Cache, Do Not Store, and Enable Caching.
Label Templates
In nested content data types we have the chance to customise the label for the items. Add these labels for each element type:
Element: Do Not Cache
Label Template: Do Not Cache
Element: Do Not Store
Label Template: Do Not Store
Element: Enable Caching
Label Template: Cache for {{cacheDuration}} {{cacheDurationUnit}}
This will show the entered duration and units
Set the Min Items property to 0 and the Max Items property to 1. This will ensure your users can't add more than 1 setting.
Now press save. Your data type should look like this:

Caching Composition
Before we add our new nested content data type to a page, we want to create a composition to add it to. That way we can use that composition on any of our pages.
Create a new document type as a Composition

Give the page a name of Page Caching Properties
Add a new group called Caching and add a new property called Cache Control Setting with a description of These settings tell the CDN and browsers how often to refresh the content for repeat visitors. This can be ignored unless you have a specific reason for doing it.
Now click on Select editor and search for caching then select the [Nested] Caching Options data type we created and click Submit. Set show label above (full width) to true and click submit again to go back to the document type editing screen.

Click on reorder

Set the group order to 80 and the property order to 5. This will push these cache settings further down the page when editing, so it doesn't get in the way of the content editing properties. Click on save.
Save this composition document type and then open one of your page document types. I'm using the default Umbraco starter kit so I'm going to use the Content Page document type. With the document type open, click on Compositions

and tick the box for Page Caching Properties

Click on submit and then save the document type. We have now completed all of the steps to get the user editing set up.
Let's edit a content page and see what it looks like. In the content tree, navigate to your content page and scroll down until you see the Caching section. Click on Add content and you will see the caching options to pick from.

Click on Enable Caching and enter 30 in the duration field and select days in the duration unit and press save and publish. Notice the label in the header of the setting has updated to reflect what has been entered.

Caching Service
Now we have given the editor the ability to set the page caching options and we have the component which can change the Cache-Control header on an individual page we need to join them up by creating a caching service.
This caching service will read the Cache Control Setting property for the page and return back the relevant Cache-Control header value.
ICachingService Interface
In your Core project or App_Code folder, create an interface called ICachingService.cs like the one below:
using Umbraco.Core.Models.PublishedContent;

namespace MyProject.Core.Services
{
    public interface ICachingService
    {
        int GetCachingSeconds(int duration, string unit);

        string GetCacheControlHeader(IPublishedContent content);
    }
}
This interface has 2 methods which need to be implemented. GetCachingSeconds and GetCacheControlHeader.
CachingService Class
Now create a class called CachingService.cs which implements this interface like the one below:
using System.Collections.Generic;
using System.Linq;
using Umbraco.Core.Models.PublishedContent;
using Umbraco.Web;

namespace MyProject.Core.Services
{
    public class CachingService : ICachingService
    {
        private const int OneDayInSeconds = 86400;
        private const int OneHourInSeconds = 3600;
        private const int OneMinuteInSeconds = 60;

        public int GetCachingSeconds(int duration, string unit)
        {
            if (duration <= 0) return 0;

            int seconds;

            switch (unit)
            {
                case "days":
                    seconds = duration * OneDayInSeconds;
                    break;
                case "hours":
                    seconds = duration * OneHourInSeconds;
                    break;
                case "minutes":
                    seconds = duration * OneMinuteInSeconds;
                    break;
                case "seconds":
                    seconds = duration;
                    break;
                default:
                    seconds = duration;
                    break;
            }

            return seconds;
        }

        public string GetCacheControlHeader(IPublishedContent content)
        {
            string cacheControlHeader = string.Empty;

            if (!content.HasProperty("cacheControlSetting") || !content.HasValue("cacheControlSetting")) return string.Empty;

            var cacheControlSettings = content.Value<IEnumerable<IPublishedElement>>("cacheControlSetting");

            if (cacheControlSettings == null || !cacheControlSettings.Any()) return string.Empty;

            var cacheControlSetting = cacheControlSettings.First();

            if (cacheControlSetting == null) return string.Empty;

            switch(cacheControlSetting.ContentType.Alias)
            {
                case "doNotCache":
                    return "no-cache";
                case "doNotStore":
                    return "no-store max-age=0";
                case "enableCaching":
                    var duration = cacheControlSetting.Value<int>("cacheDuration");
                    var unit = cacheControlSetting.Value<string>("cacheDurationUnit");

                    var seconds = GetCachingSeconds(duration, unit);

                    return $"public max-age={seconds}";
            }

            return string.Empty;
        }
    }
}
GetCacheSeconds
The first method GetCacheSeconds is responsible for taking the duration and unit and converting into seconds, to be used in the max-age value.
GetCacheControlHeader
The second method GetCacheControlHeader checks if there is a caching setting added, it finds the document type alias and the returns the relevant header value accordingly.
Register the Caching Service for Dependency Injection
Before we can use this caching service in our component we need to register it. We do this by creating another Composer which is responsible for registering such services.
Create a class called RegisterServicesComposer.cs and in the Compose function we will tell it to register CachingService as an implementation of ICachingService with a lifetime of singleton, which means it will just be created once for the lifetime of the application.
using MyProject.Core.Services; using System.Configuration; using Umbraco.Core; using Umbraco.Core.Composing;
namespace MyProject.Core.Composing
{
[RuntimeLevel(MinLevel = RuntimeLevel.Run)]
public class RegisterServicesComposer : IUserComposer
{
public void Compose(Composition composition)
{
composition.Register
Use the CachingService in the PublishedRequestComponent
Now we have our service registered for use with Dependency injection we can update our PublishedRequestComponent class.
Important. Add a using statement at the top of the PublishedRequestComposer.cs file. Without this, it wouldn't know about the CachingService.
using MyProject.Core.Services;

public class PublishedRequestComponent : IComponent
{
    private readonly ICachingService _cachingService;

    public PublishedRequestComponent(ICachingService cachingService)
    {
        _cachingService = cachingService;
    }

    public void Initialize()
    {
        PublishedRequest.Prepared += PublishedRequest_Prepared;
    }

    private void PublishedRequest_Prepared(object sender, EventArgs e)
    {
        var request = sender as PublishedRequest;

        var cacheControlHeader = _cachingService.GetCacheControlHeader(request.PublishedContent);

        if (!string.IsNullOrWhiteSpace(cacheControlHeader))
        {
            request.Headers.Add("Cache-Control", cacheControlHeader);
        }
    }

    public void Terminate()
    {
        //unsubscribe during shutdown
        PublishedRequest.Prepared -= PublishedRequest_Prepared;
    }
}
We have added a readonly property of _cachingService and set that property using dependency injection in a constructor.
private readonly ICachingService _cachingService;

public PublishedRequestComponent(ICachingService cachingService)
{
    _cachingService = cachingService;
}
Then we have used the caching service to get the Cache-Control header value. If there is no setting applied we don't add a Cache-Control header value at all.
private void PublishedRequest_Prepared(object sender, EventArgs e)
{
    var request = sender as PublishedRequest;

    var cacheControlHeader = _cachingService.GetCacheControlHeader(request.PublishedContent);

    if (!string.IsNullOrWhiteSpace(cacheControlHeader))
    {
        request.Headers.Add("Cache-Control", cacheControlHeader);
    }
}
If you're in Visual Studio rebuild the solution. If you're in VS Code you might need to stop the site and start it again. This will make sure the CachingService is available for you.
Testing this out on the front end
Go to the url of the page you edited the Cache-Control setting for and as we did at the beginning have a look at the headers for the page request in the network tab in dev tools.
If you have set it to cache for 30 days you should see a value of public, max-age=2592000

You can then go back and test it out with the other settings and you should see values of either no-cache or no-store, max-age=0
About Moriyama
Moriyama are an Umbraco Contributing Gold Partner. Articles like these are one of the ways we contribute to growing a stronger Umbraco community. If you have any questions about this article or would like to speak to someone from Moriyama about this article or Umbraco in general, please get in touch.