Blog: Automate your local IIS Development Environment
Last week we created a post called “How to Create a Self Signed Certificate For Your Local IIS Website” and I was thinking what if we took this to another level. What if there was a script that could completely build your development IIS site, with bindings, the correct permissions for Umbraco and assigning a self signed certificate on top of that too!
You can find the script here: https://github.com/mattou07/iis-builder
Why this is useful
During my time at Moriyama I would build my project in Visual Studio and then use the built in IIS Express to run my site for local development.

However I noticed my colleagues would use a local IIS site to work on their projects. They would simply build the project in Visual Studio when they wanted to test a change and then visit the local IIS site on their machines.
The benefit of using IIS instead of the built in IIS Express is that Visual Studio can be slow when in debug mode additionally once you have built the site you don’t have to build it again and you can just visit the local IIS site at a later time.
Another added benefit is consistency. The bindings for the IIS site are specified in a JSON file this allows for all staff working on the project to use the same local hostnames and services such as lastpass become more easily usable with local sites since all the hostnames are the same across the team.
But I need to debug my solution!
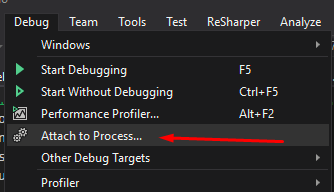
Luckily, Visual Studio comes with this feature “Attach to Process” (Make sure Visual Studio is elevated to run as Admin).

You then need to find the w3wp.exe process, you may have multiple entries for this exe if you have multiple IIS sites running. To find the the correct one look at the User Name column it will contain the name of the App Pool.

Now you should be able to debug your project while it is being run by your local IIS instead of IIS express.
Attaching the script as a post build event in Visual Studio
An added bonus is setting up a Post Build Event (PBE), a PBE is an event that you want to happen after the build is complete. This will allow the script to run every time you build the project so that the first time you build the project it will automatically create the IIS site and then open it in your default browser. The next time you build the project the script will check if the IIS site exists and if it does it will just open the site in your default browser.
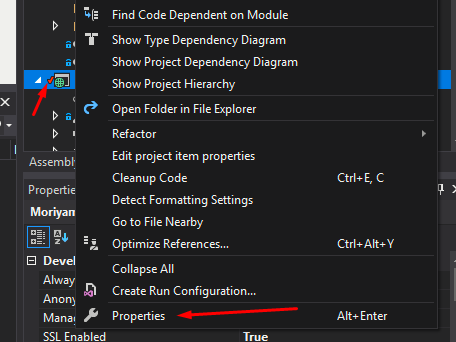
To set this up right click on the web project and click properties.

Head to the Build events section and in the Post-build event command line add this:
%SystemRoot%\sysnative\WindowsPowerShell\v1.0\powershell.exe -ExecutionPolicy Unrestricted -file $(ProjectDir)\IIS-Builder.ps1
What this command means
%SystemRoot%\sysnative\WindowsPowerShell\v1.0\powershell.exe
We fetch the location of your Windows Powershell exe. Some users may not have it in the same place so using: %SystemRoot%\sysnative should allow it to work on most windows machines.
-ExecutionPolicy Unrestricted
Since this script is being downloaded from the internet powershell will automatically block it. Setting the Execution Policy to Unrestricted will allow you run the script without having to create your own Powershell file and copy the code and save.
-file $(ProjectDir)\IIS-Builder.ps1
We then specify that the powershell script is in the same directory as the web project being built using $(ProjectDir).
What is .localtest.me?
.localtest.me is an trick that Paul Seal mentioned to me. Whenever you create a domain and append .localtest.me it automatically points to your machine without having to edit the hosts file. Keeping things cleaner! (the owner of the localtest.me domain has usefully provided a wildcard DNS setup where any host name points to 127.0.0.1)
However if you would like to use custom hostnames you still can and the script will add those bindings into your hosts file.